


Re-detailing The Bachmann On30 Climax
Introduction & Taking It Apart

Bachmann Climax Conversion to Date (September 17, 2010).
Introduction:
My father and I’s little On3/On2 model railroad (the Diamond Springs & Fiddletown Railway) is best served by small geared locomotives. We already have several shays in progress, so I was looking for something different. Small Heislers are few and far between (and very expensive). That left Climaxes. Supposedly, Precision Scale Co. has several kits available, but I’ve never seen one, let alone one for sale. Flying Zoo made an 18-Ton one just the right size many years ago. They are hard to find and can be expensive. My father had one, but eventually sold it because of the amount of work that would have been required to build a boiler rear end/back-head for it. Backwoods Miniatures sells a kit for one about the right size (20-Ton, built to the same plan as the Flying Zoo locomotive). Though we have several of his fine kits, they are a long project to build right (I have too many multi-year projects now) and this kit is a little too whimsical for my tastes. This left the Bachmann “On30” 28-Ton Two Truck Class B Climax. My father already has one and it can be seen working the mining tipple in the D.S.&F. Ore Train Photo Gallery in the Photo Gallery section. I found one, new in the box, at the O Scale National/O Scale West convention at Santa Clara, California, July 2010 for
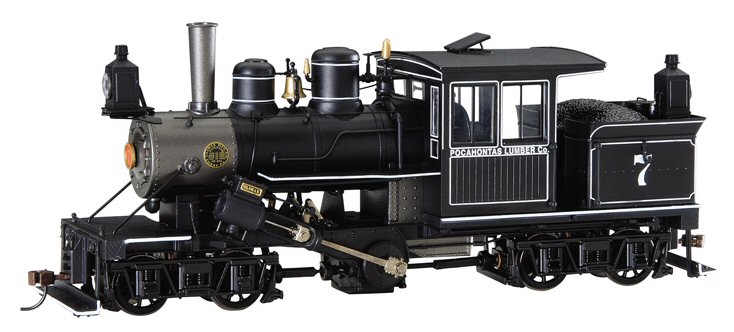
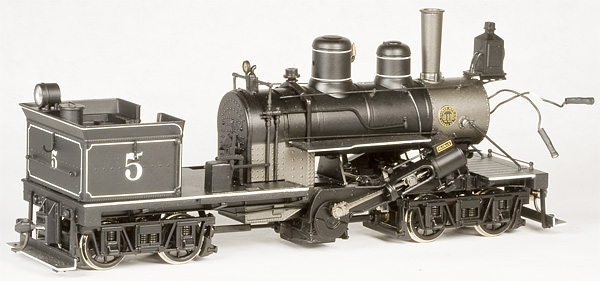
Bachmann Industries Item No. 25760: “On30” 28-Ton Two Truck Class B Climax Locomotive - Pocahontas Lumber Co.
Bachmann’s line of On30 locomotives run the gamut from crude toys to well done models of some really neat/useful prototypes (The 2-6-6-2 is my current favorite, but more on that later). At the time the Climax came out, Bachmann’s other locomotives definitely fit into the “toy” category, with the 1
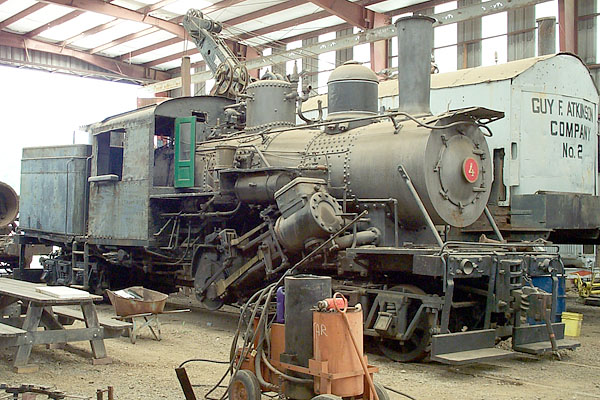
Pacific Lumber No. 38 at Roots of Motive Power, Willits, CA.
The point of this little adventure will be to make the necessary changes to this model to turn it into a prototypically correct, Class B Climax. Though not any one, specific Climax. Most the work will go into converting it into a true oil burner. If you’re following along with your own model and are building a wood or coal burner; you’re in luck. All you’ll have to do is add the missing details (and not very many at that). Making a true oil burner is a different story (specifically, this story). While I give credit to Bachmann for even offering an oil burning option (which actually includes a proper shut-off valve!), the oil tank isn’t even remotely the right shape for a Climax built oil tank and all of the oil delivery pipes and firing controls are missing. Luckily for me, the Roots of Motive Power museum group right here in Willits, California, has a standard gauge, Class B, oil burning Climax: Pacific Lumber No. 38 (60 ton, c/n 1621). They also have an oil burning Heisler (Bluestone Mining and Smelting Company No. 1, c/n 1351, 47 ton) and an oil burning Class B Shay (Robert Dollar Lumber Company, c/n 2978, 50 ton) for comparison and study of prototype practice. I’ll post relevant photos as I go along. It will take a while to post all of this project online, so you’ll have to come back from time-to-time to see the changes and additions. I’ll also have to carve it up over several “pages” to keep from clogging up download times with all the photos.
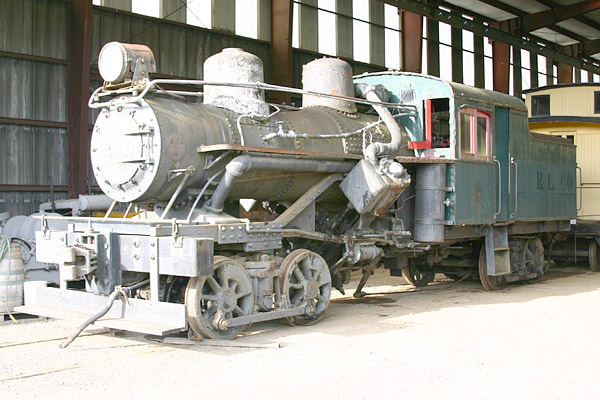
Bluestone Mining and Smelting Company No. 1 at Roots of Motive Power, Willits, CA.
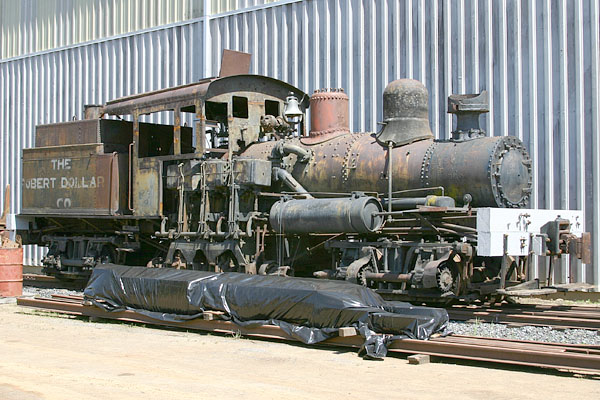
Robert Dollar Lumber Company Shay (what’s left of it) at Roots of Motive Power, Willits, CA.
Let’s get started…
Basics - Taking it Apart:
Bachmann’s exploded diagram isn’t real clear on how to take the Climax apart, so I’ve put up these photos as a guide.
- Trucks:
The trucks on this locomotive are a little unusual in that Driver/Axles and Gear Box can be removed independently of the truck side frames. If you wish to remove the entire truck, you’ll have to remove the Gearbox/Wheel Assembly first to get to the screw that holds the sideframes on.
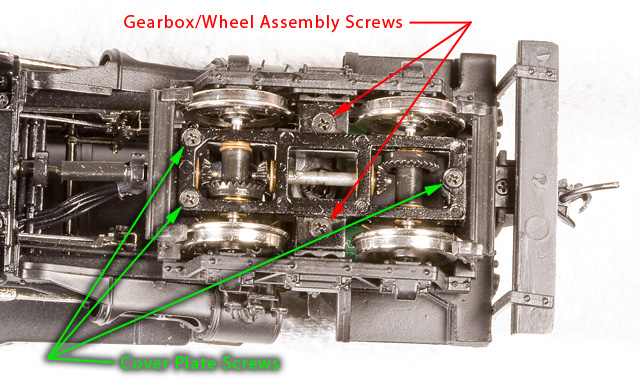
The Cover Plate Screws will allow you remove the axles and gears from the truck. The Gearbox/Wheel Assembly Screws will allow to remove the entire Gearbox/Wheel assembly at once, leaving the side frames attached to the rest of the locomotive.
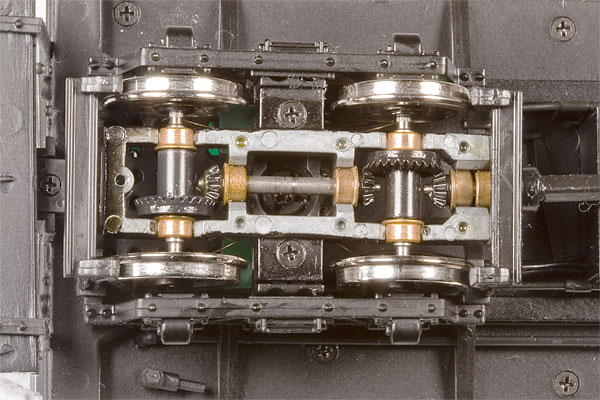
Truck with the Cover Plate removed.
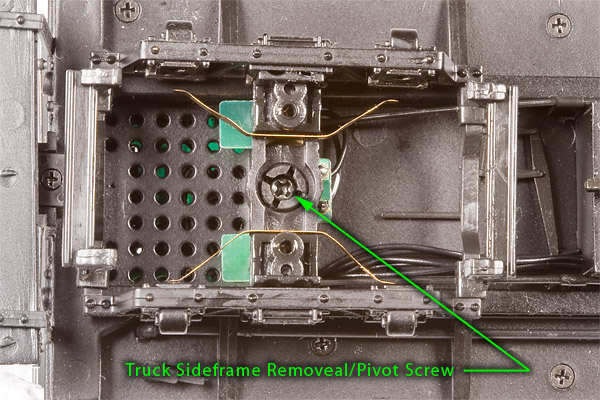
Truck with the Gearbox/Wheel Assembly removed.
Truck Pivot/Wiper Plate. When re-assembling, re-install the cup-shaped washer with the cup pointing down (relative to locomotive).
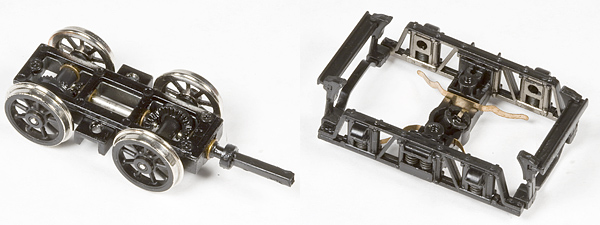
Gearbox/Wheel Assembly and Truck Sideframes.
- Water/Fuel Bunker:
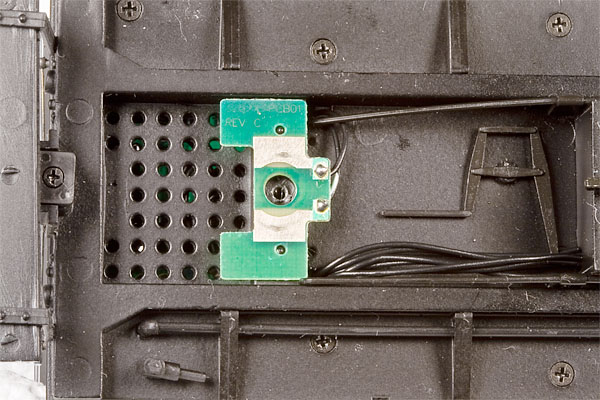
All of the wiring for the locomotive goes to a circuit board mounted inside the water bunker. You may find it easier to install/replace a DCC decoder with the water bunker removed. Water/Fuel Bunker is held on by three screws, one of which is slightly trapped behind the water supply pipe going to the injector on the fireman’s side (apparently, the other injector just sucks air - we’ll fix that later). There also two pins in the rear corners of the bunker which position the water bunker on the frame. Be careful of a loose “fuel load” when removing the water bunker. The leads to the Rear Headlight’s LED are little stiff, but just pull off. Be sure to mark which one goes to which lead (one wire has a
daub of white paint on it, which is theBLUE lead in DCC terms - orcathode orcommon or− ; the other is theYELLOW lead in DCC terms oranode or+ ).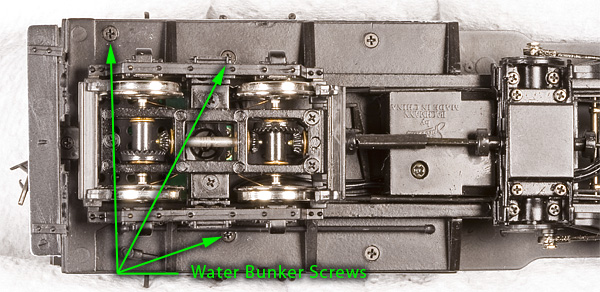
Water Bunker Screws.
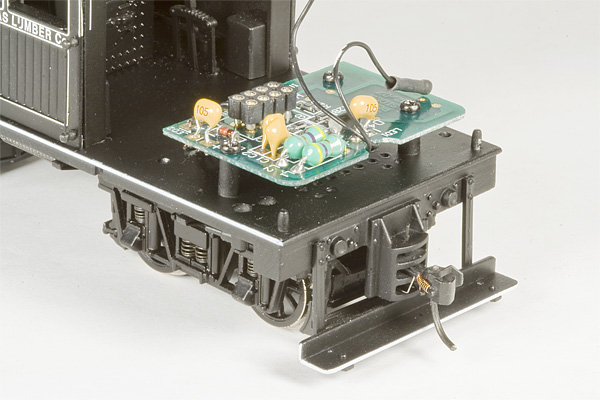
Back of Locomotive with Bunker Off.
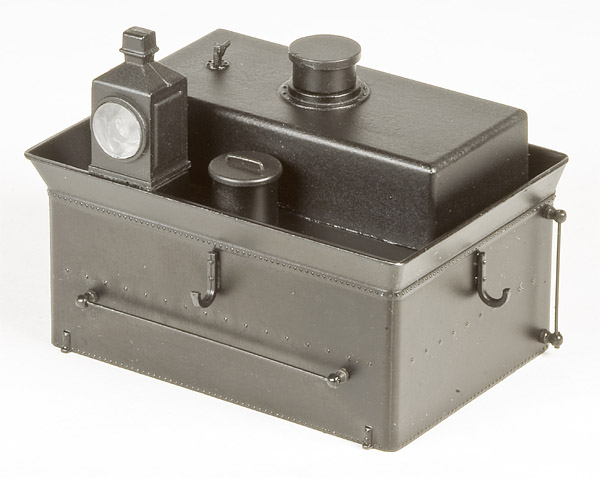
Stock Bachmann Water Bunker with “Oil Tank.” This is the part we’ll be heavily modifying in this article.
- Cab:
The cab, which is held on by two screws, can come off by itself or with the boiler. If you take just the cab off, you’ll have to contend with the handrails, plumbing, bell cord, cylinder cock release lever rod, and the reversing lever rod (the “Reach Rod”) to get it loose. The cylinder cock release lever rod and reach rod can be pivoted out of the way easily enough, but, the handrails will have to be carefully bent out of the way with the cab partially pulled up in its mounting slot. The rest of the plumbing falls away easily as they extend only part way into the cab front.
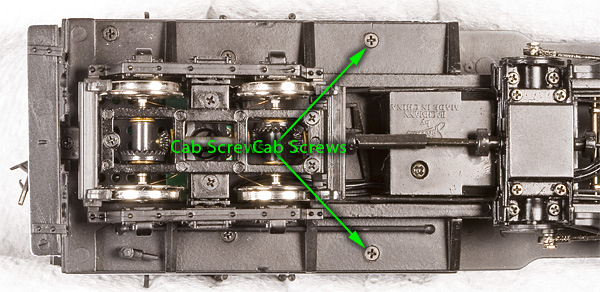
Cab Screws.
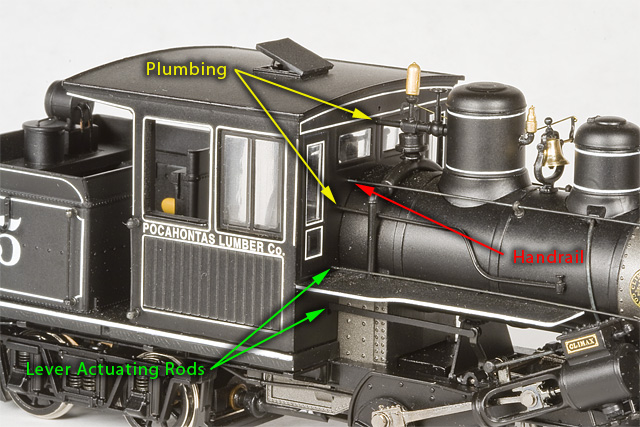
Plumbing, Rods, and Handrails that interfere with Cab Removal.
Locomotive without Cab. Note that the whistle/globe valve assembly is a tee-shaped casting with pipes that go into holes in the cab front, steam delivery pipes (the “Dry Pipes”), and the steam dome. The stock locomotive is missing the throttle rod and whistle actuating rod (though there is a hole for this rod in the cab front).
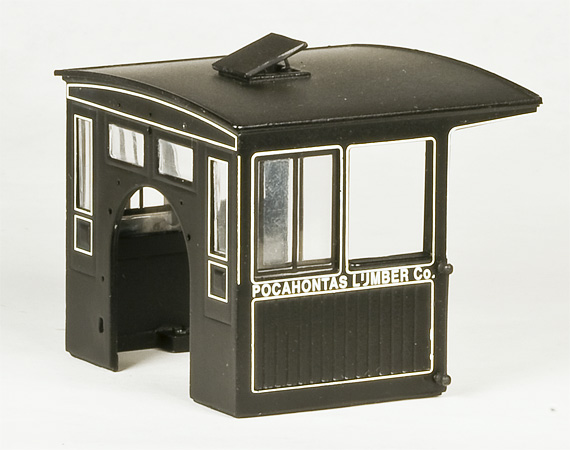
Stock Bachmann Single-Panel, Wooden Cab.
- Boiler - Boiler/Cab Assembly:
The boiler can be removed with the cab as a unit or after the cab has been removed separately. The boiler itself is attached with only one screw, inside the smoke box. The back of the boiler is a tight fit over the motor, in aligned with locating pins in the corners of firebox, and is trapped by the cab and some detailing. To remove the boiler and cab as a unit: remove the two cab screws, the screw in the smoke box, rotate the lever actuating rods (the Reach Rod and the Cylinder Cock Release Rod) out of their holes in the cab front, and disengage the dry pipes from the inside of the cylinders (the cab can be separated as above). The ends of the two pilot supports are probably stuck in their holes in the end beam, but will come out without too much work. The only real stinker is the smoke box front. It’s glued in. See below for how to remove it the first time. There is a socket inside the shrink wrapped wires that connects the headlight LED leads to their supply wires, which will pull off with a little effort. Don’t forget to note which wire goes to which lead (one wire has a
daub of white paint on it, which is theBLUE lead in DCC terms - orcathode orcommon or− ; the other is theWHITE lead in DCC terms oranode or+ ).
Removing the Smoke Box Front the First Time (it’s glued in - how helpful). Remove the number plate; drill two holes side-by-side through the “D” shaped hole; put a 90° bend in the end of scrap piece of stout wire that will fit in the hole; insert the wire; pluck the smoke box front out, pulling on the wire with a pair of pliers.
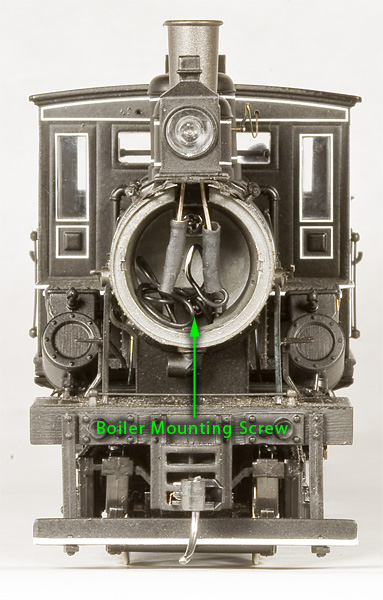
The screw that holds the boiler on.

Locomotive Frame without Boiler and Cab.
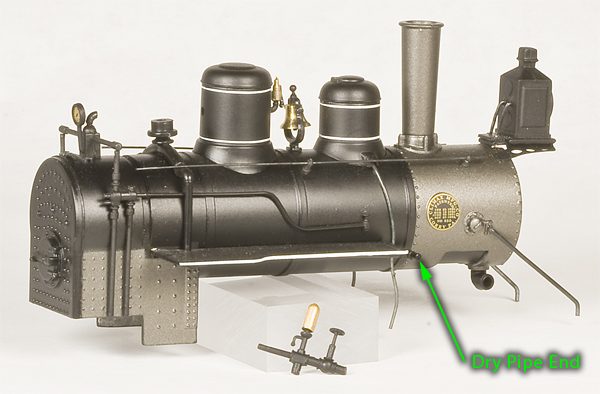
Boiler alone, removed from locomotive.
Continues on Next Page!
©2010, 2011, Scott Kitts. All rights reserved.
Rev. 3/28/2014.